Thursday, August 11, 2011

In the heat of training rides

While I do ride out in some beautiful parts even when training, here's an early post from Bikeszone of a kind of ride I haven't done in a long, long time.

I post this as a reminder to myself to hurry up and get the Volpe back in action (cable upgrade, stalled at derailleur adjustment) and do something like this again soon. I've had a plan for a while to take pictures all the way down Sunset Blvd from its rather gritty start in Los Angeles to its end at the ocean in Santa Monica.

Tuesday, August 9, 2011

Why a stable?

Many non-cyclists are astonished to hear I have three bicycles (this is actually a small number of bikes to own, trust me). On hearing this, there's the inevitable, wide-eyed, slightly disbelieving, “But why three?” With an unspoken hint of, “I'm pretty sure you're insane, but let me make you say it so I'm justified in throwing this quiche in your face and running out of here.”

The answer is simple. I own more than one bicycle because there is more than one kind of bicycle.

You could, in theory, have one large pot in your kitchen in which you make everything, from tea to rice to fried chicken, but most cooks understand that different tasks need different tools. And if you don't, I really don't want to come to your house for dinner, thank you. Oh, I'm sure your one-pot chicken stew will be fantastic, but I'm not so sure I'll want the chicken-flavoured payasam. And the chicken-flavoured-payasam flavoured tea.

Different spokes
I think everyone understands the basic bicycle divide: mountain and road. Even the uninitiated can see that one has fat tyres, suspension and a flat handlebar. The other has thin tyres, no suspension, and, usually, the infamous “racing bars” or “curved bars”, known as drop bars. Those who look closer will see that the frames are different as well. Road bikes and mountain bikes have different stances, and put the rider in different positions relative to the bike itself.

But just as under frying pans there are saute pans, omelette pans, cast-iron pans and so on, there are different kinds of mountain bikes (MTBs), each designed for a certain kind, or intensity, of off-road riding. Some MTBs are cheap and meant simply to ride around the park on unpaved roads. As you go up the range, they can take more and more beating, and eventually you end up at the downhill bikes—heavy, extremely strong machines that can barrel down mountains chomping 30-foot drops with ease.

Road bikes tend to look very similar to the untrained eye, but sport differences that make some suitable for touring, others for long, fast rides, and still others exclusively for racing. Many of these are in the geometry of the frame, others are in the features available. For instance, a touring frame will have attachment points for racks, while a racing bike won't. A touring frame will put the rider in a comfortable, stable position, while the racing bike will have the rider bent over in a more “aggressive”, aerodynamic position. And there are a range of bikes that are the grey areas in the middle, and yes, the differences between some of these sub-castes can be subtle.

Imagine if cars weren't as expensive and damaging as they are and that we all lived on big estates with tons of garage space. You can see how we might have many kinds of vehicles. Perhaps a good 4WD for off-roading. A large people-carrier for family runs. A plush, quiet car for commuting. A hardcore sports car for track days and Sunday drives in the mountains. A vintage car to tinker with in the evenings. A cheap runabout for quick errands.

That's the good thing about loving cycles, even motorcycles. You don't have to be a billionaire to have a stable.

Monday, August 8, 2011

The Race Across America

This velokundi was on the crew for Samim Rizvi's attempt at the Race Across America, or RAAM. The article about the experience.

Wednesday, August 3, 2011

Spinformation


With cycling, there are many, many things I wish I'd done from the start and one of them is having cadence information.

When I bought my first “good” bicycle four years ago, I thought $400 was crazy expensive (but had read over and over that about $400 was a line you must cross if you want something that lasts). Ah how fresh-faced and innocent I must have been. So I decided that a bicycle computer was an unnecessary indulgence, and even when I did come around, I bought the cheapest one I could find.

Looking back now, I want to beat myself upside the head and tell me to just pull out the dosh for the Cateye Strada Cadence, the wired one is fine. It's not expensive (I know now), but at the time, paying $40 for a bicycle computer when you could get one for $14 seemed just wrong.

But I believe that a new rider, perhaps more than anyone else, must get a computer with cadence.

There's lot of detail out there about whys and wherefores, but simply, cadence is a measure of how fast your legs are pumping. When peering at sports motorcycles, the first thing many people notice is that the tachometer, or rev counter, is the king of the dashboard. That's because it's a direct view of what the engine is doing, making you a much more informed and efficient rider. Same with cadence (and later, heart rate). It's a direct reading from the engine and is much more useful to the rider.

Many beginner cyclists ride at very low cadences—40 to 60rpm. For us Indians, one reason is most of us grew up with single-speed bicycles, and if you changed cadence, you also changed speed. If you wanted a higher cadence, you also had to be able to sustain a higher speed. So we learned to ride low and slow.

But one of the biggest advantages of gears is that you can vary how fast your legs are turning without changing your forward speed. You can ride at 20km/h with your legs slowly pumping up and down at 40rpm, pushing a big, hard gear, or you can change to an easy gear and ride with your legs flying up and down at 100rpm. The latter is your goal. Not necessarily 100rpm, but to ride at any given speed with your legs moving quickly and lightly on the pedals. A good early goal is 90rpm, but if you're used to slow hard cranking, and find that too fast, at least get up to the 80s.

Why?

Less stress on your knees. Imagine you have to move your dumbbell set upstairs. The low cadence approach is to load them into one big sack and struggle up the stairs, risking having your spine fly out of the top of your head. The high cadence approach is to divide the load into four parts and run up and down the stairs with them. Far less risk of injury.

Less tiring. Back to dumbell example, you can see how the low cadence approach will exhaust your muscles, and you'll need recovery time before going back for the barbells. But the high cadence work leaves you fresh, and you can skip straight back down after the last load of dumbbells and get started on the rest.

But, but, but...

“I want to develop muskulls! Shouldn't I do heavy weight, low reps, i.e. low cadence?”

There's a place for low cadence, high resistance work, but only in short, well-thought-out workouts MUCH later in your cycling career. Even then, these workouts come with warnings to stop if you feel any kind of pain or not do them if there's any soreness in the legs. They are also carefully spaced out. They are effective but potentially dangerous medicine, and don't belong in a beginning cyclists' cabinet.

“But won't I get tired running up and down the stairs four times instead of walking up once?”

Yes, but you will recover in just minutes since you're taxing only the aerobic system. With the low cadence approach, you're tiring the muscles (by using other energy systems, but let's leave that for later), and will need hours or even a day or two for your muscles to recover.

“What recovery? I'm pedalling all the time!”

Yes baba, that is why you must apply high cadence from the start and get your body used to it. You'll pant a little in the beginning, but very soon find that you can switch on your pedalling and run it effortlessly for as long as you need. It's a good feeling, so chase it now!

"Isn't it some complicated sensor system?"

Not really. You stick a magnet on the crank arm (the bit the pedal is fitted to) and a sensor sits on the bike frame. Every time the magnet passes the sensor it counts a rotation, displaying your cadence on the screen. If you have the budget, get a wireless one (quality is more important here, otherwise you'll get glitches from interference) to save the initial trouble of routing the wires along the frame. But even with the wired one, it's just a few minutes' work with a handful of Zip ties.

Tuesday, August 2, 2011

Playing wheelwright


The photo shows everything you need to build yourself a bicycle wheel. Missing from the picture is a guitar plectrum, an important tool that lets you use tone to equalise spoke tension. (You could use your nails or an old credit card of course, but a plectrum is far more fun, and makes a louder sound).

Shown, roughly from left to right, is a Park Tools TS-8 truing stand, a Velocity Synergy off-centre 32-hole rim, Wheelsmith 295mm and 296mm double-butted stainless steel spokes, nickel-coated brass nipples, Phil's Tenacious Oil, a Shimano Ultegra 32-hole rear hub, a Park Tools spoke wrench, a screwdriver modified to use as a nipple-driver, and a printout of chapter four of the excellent e-book 'Professional Guide to Wheel Building' by Roger Musson.

My first wheelbuild is documented on this thread on Indian bike forum, Bikeszone. This is my fourth build, and the first time I used a truing stand. Things are a lot easier now--the wheel comes together with very little play to start with, so there are relatively few final adjustments. I don't think I'd want to build wheels for a living, but I really enjoy it when it's spaced out like this. (Four wheels over two years or so.) I also take a day or two between lacing and final tensioning.


This is the wheel just after lacing. Then you plug it into the socket and zap all the spokes straight. It's a patented technique and demands great skill. Don't try it at home!


Here's the built wheel. Note the valve hole at the centre of the photo, and you can clearly see how much off centre the drillings are for the spoke holes. Follow the spokes to the hub and notice how small the dish is. That's the advantage of using an off-centre rim. (You'd use one on the front if you were building wheels with disc brakes.)

Roger Musson isn't too fussed about choosing off-centre (or OC) rims, saying that if there was something wrong with regular rims, we'd have heard about it by now. However, Peter White, well-known wheelbuilder, writes on his website of the Velocity Aerohead (and implying OC rims in general): "The OC rim is a big advantage when built on a high dish rear hub like the current Campagnolo hubs, but less of an issue on Shimano hubs. But if you're having a set of Shimano wheels built and want the Aerohead it's silly not to use the OC version in back. It only costs $1 more, and gives you a wheel that's close to ZERO dish!"

I've also written about wheelbuilding in an Off the Cuff, here.

Living with the Edge

Nope, I'm not shacking up with a member of U2, I've just acquired the Garmin Edge 500, a GPS-enabled bicycle computer. This is not intended to be a review of the device, there are lots of those online, but a chronological account of my use of it, and therefore, I hope, avoiding the "very nice, but what does this actually mean in real life?" questions I always have when reading comprehensive reviews of a product.

Up to now, I've managed my training with this set-up:


That's the Cateye Strada Cadence (wired), and the most basic Polar heart-rate monitor (HRM), the F1. And yes, that's a studly low heart rate for someone straddling a bike and taking photographs. Standing barefoot on the grass probably helped. It was an effective, easy-to-see set-up, and funnily, I never thought about its limitations until I actually started using the Garmin.

A big change in my training, one I'll talk about later, means that I now need to upload and share data easily, which is why I finally leaped at a Performance Bike sale and bought the Edge.

My first reaction was that it was a good size and of pleasing proportions. The blue and white make it look toy-like, and that actually appeals to me. Perhaps a reminder to not get roadie serious about the self? Because the buttons are well-shielded from the elements, they aren't too easy to press--a place where, no doubt, the touchscreen big brother, the Edge 800, shines.

This is what comes in the box:


I realise that a dark picture of lots of black components tells you phuck-all, but clockwise from top left is the HRM strap, lots of rubber bands for mounting, mounts for two bikes, wall charger with USB cord and various pluggies, Manuels, the unit, the cadence and speed sensor with an optional mount for narrow chainstays, zip ties and magnets, one to put on the crank arm for cadence, the other on the rear wheel for speed.

Mounting is easy, and I have it on the stem. Pictures in a bit, but all you have to do is rubber band the mount with two bands. To fix the computer you simply place horizontally into the mount and rotate into place. Such a blessing after the damn Cateye Strada which you have to unceremoniously rip out each time, skinning your thumb, accidentally resetting it and generally getting quite teed off.

Here's the cadence and speed sensor in place:


Because the Edge 500 has GPS magic, it can calculate speed and distance without this sensor, so I guess this is just back-up and correction? Cadence, however, needs a sensor. I have a magnet simply placed on the pedal spindle, where it stays in place from sheer magnetic will alone, so no ugly zip ties on my beautiful SRAM Force crank arm. No trouble at all getting the magnets close enough for the sensor to sense them, and no trouble getting the unit to detect the HRM strap and cadence sensor.

First draft of screenplay
The first thing that struck me about the Edge 500 is how much information can be displayed. There are 36 possible data fields (45 if you have a power meter) that can be displayed on three screens. Here's my first draft of the first screen:


That's too busy, so my current set-up has seven data fields instead of eight, giving heart rate pride of place on the top field.

My second screen is set-up for intervals, and this is the first draft:


And the third is a miscellaneous screen, with information for motivational purposes on climbs or on long rides. I've completely changed this one, so this picture is just for you to see what else the Edge has to show.


Charts, sharts
And if you think that the Edge itself shows a crazy amount of information, wait until you bring it home after a ride and plug it into a computer. (And do sundries like getting it to work with Garmin Connect, Garmin's web-based training log.)

Here's a link to my first logged climbing workout.

My assigned goal was to climb 3,000ft, so the 'total ascent' data field on the device was immediately useful. 'Grade' was also of interest to me, since cyclists are always talking about slopes in percentages, and I was keen on getting a fix on just what 6% or 8% meant in terms of cycling effort. Learning these numbers helps every kind of cyclist, from tourers planning holidays, to commuters plotting the shortest, yet least sweaty, route to work.

Also, the legendary Glendora Mountain loop, one of the stages in the AMGEN ToC is pretty much a backyard ride for me. I've done it a few times but always on the Volpe (with the moral support of its triple), and have always wondered what the total ascent is. I now know it's about 3,300ft, just over 1,000m. Interestingly, that's about the elevation of the home town, Bangalore.

So once plugged in, the elevation profile of the ride was my focus.


Yup, you can see why this is a beloved ride. You get about 14km of fast descent, down a nice bendy road that has almost no traffic on weekdays.

And don't forget that the Edge 500 has GPS, even though it doesn't have base maps and turn-by-turn directions. So once you upload a ride, you get a nice map, shown here with the laps I set.


Split 1 to 2 is a climb I've done often, and I want to keep a sharp eye on my times on it in the future. Once you ride a route and have the GPS path, you can set it as a course and transfer it back to the Edge 500. (Or you can create a new course on a site such as Bike Route Toaster.) Then when you want to repeat it, you select 'Do course' and get a trail on the screen to follow. More on that when I actually try it. I'm hoping it'll make my trips into LA a little faster. I always get lost when relying on what I called my Garmean, a paper clip Zip-tied to the bar, holding a printout from Google Maps.

Working out workouts
With my 3,000ft climbing goal for the week met, I had a set of sprint workouts ahead of me. I was required to ride a 1.25mi loop, doing a 300m sprint in my 50-16 gear, and recovering for the rest of the distance. No rinse, and repeat seven times. Imagine standing up and hammering, trying to monitor 300m on a tiny screen through a haze of sweat, blood and spit. (Okay, no blood, but if you've done a series of all-out efforts, you know exactly what I mean.) And that's why, my carbon clown buddies, the Edge 500 offers the 'workouts' feature.

Set up your complicated workout earlier, then just click a button and have the Edge do all the secretarial work of monitoring your distance or time, and even heart rate and speed goals. All you have to do is hammer and listen out for a beep. Or you could watch the Edge count back your time or distance to zero.

Once you get one of these I'll let you figure out (and tell me) why Garmin makes you use Garmin Training Center to create a workout, but let's not worry about that right now. Here's a screenshot showing my sprint workout in Garmin Training Center's workout creation dialog box.


So once I start the workout, it'll wait until I press the lap button and then start counting back my 300m distance for the sprint. Then it'll count back my rest distance, and repeat until I finish the seven sets or stop for a quick vomit. (As I almost had to when I did it recently.)

Let's look at the drop-down options in the dialog. (All of these can also be set on the device itself. It's pleasantly non-painful.)


So you can tell Mr. Edge, "I want to ride until I have 1cm needle depth numbness in my penis, and...


...while doing so, I want to keep my self-image in the 'smarmy' zone."

It's pretty cool actually.

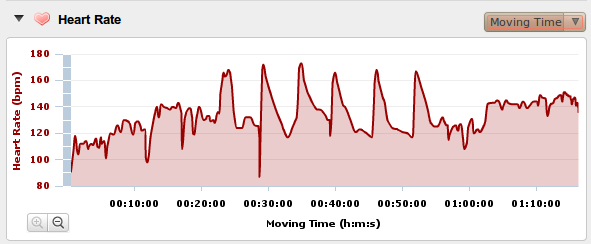
Okay, so once your sprints are done, you'll want to come home and anal-ise. Elevation is of no interest, this time it's heart rate.


You can clearly see the spikes of the five sprints. But wait, there's six. A quick look at the corresponding speed chart...


...shows the first spike is accompanied by a sharp drop in speed. Oh of course, it's the steep climb onto the Santa Fe Dam where I did my sprints. You can see the opposite at the other end of the workout where there's a steep rise in speed, but a drop in heartrate, as I swooped back down off the dam. This is an obvious example, but just an idea of how you can start dissecting your rides. The heartrate and speed spikes of the sprints will be closely compared to the ones from the next workout, and over the months I'll have a great record of how I'm doing.

All of this is just from my first few days with the Edge 500, so there's more to come. If at the end of all this, you're asking, "Okay, all this is very well, but what's the use of it all? Are you racing? Are you being paid to sprint 1mph faster at an HR that's 10 beats lower than last month? You have graphs, so what?"

The answer of course is: if you have to ask, you're not a velokundi. Come back when you are.

Monday, August 1, 2011

Sprint workout

Chung King fried chicken cubes with hot peppers for dinner + sprint workout the next morning = cloudy with a chance of meat chunks.

Finally did only five out of the scheduled seven.